
The TOPdesk Jira integration works with an app that needs to be installed in Jira. In the app, you can then configure the API details of TOPdesk. This is necessary to have Jira and TOPdesk communicate with each other.
Step 1: Install the app in Jira
A Jira admin can install the app in Jira by following these steps:
-
Login to Jira as an administrator.
-
Select ⚙️ > Apps.
-
Search for the TOPdesk Jira integration app and open it.
-
Click on Try it free or Buy now at the top of the page.
Jira will let you know when the app is installed successfully.
Step 2: Create a functional operator in TOPdesk
The Jira app needs access to your TOPdesk instance. We're going to create a functional operator in TOPdesk with sufficient rights to the relevant TOPdesk API's. In step 3, we're going to use this functional operator to give the Jira app access to TOPdesk.
2.1: Create an operator
-
Create a new operator: TOPdesk Menu > New > Supporting Files > Operator.
-
In the surname field, fill out Jira integration.
-
Fill out the mandatory Site field.
-
Select under TOPdesk login to add login credentials.
-
Save the new operator.
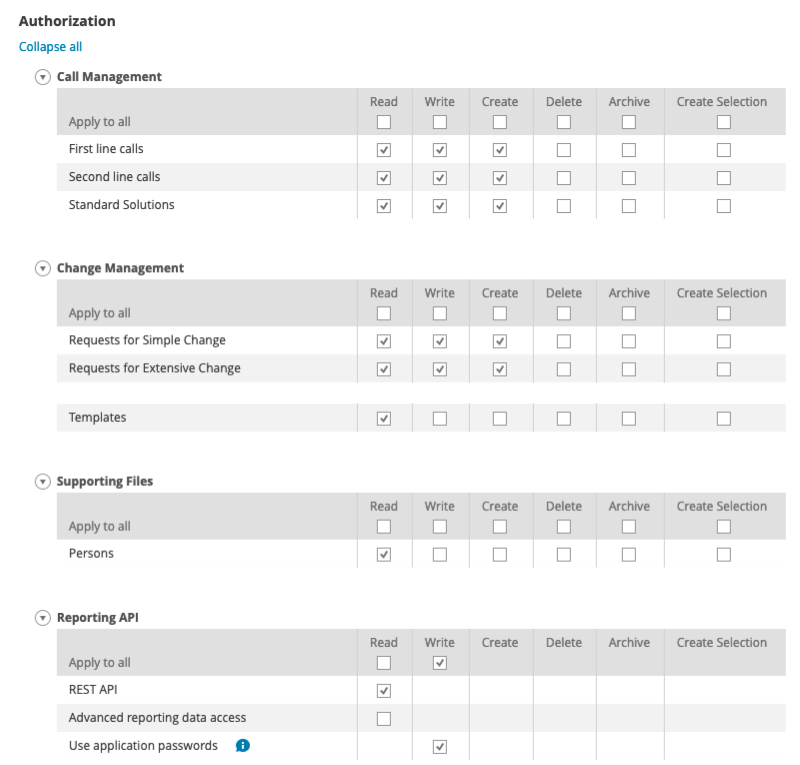
2.2: Create a permission group
-
Create a new permission group: TOPdesk Menu > New > Supporting files > Permission Group.
-
Give it a clear name, such as Jira integration permissions.
-
Enable the permissions as stated in the 4 tabs below.
-
Save the new permissions group.
Call Management
|
Permission |
Read |
Write |
Create |
|---|---|---|---|
|
First line calls |
✅ |
✅ |
✅ |
|
Second line calls |
✅ |
✅ |
✅ |
|
Standard Solutions |
✅ |
✅ |
✅ |
Change Management
|
Permission |
Read |
Write |
Create |
|---|---|---|---|
|
Request for Simple Change |
✅ |
✅ |
✅ |
|
Request for Extensive Change |
✅ |
✅ |
✅ |
|
Templates |
✅ |
|
|
Supporting Files
|
Permission |
Read |
|---|---|
|
Persons |
✅ |
Reporting API
|
Permission |
Read |
Write |
|---|---|---|
|
REST API |
✅ |
|
|
Use application passwords |
|
✅ |
2.3: Link the operator to the permission group
-
At the top of the permission group, select the Operators tab.
-
Select the blue Links Wizard.
(If you can't find this button, make sure to save the permission group first). -
Find and check the box for the Jira integration operator you created earlier.
-
Select the Link button.
2.4: Create an application password
The TOPdesk Jira Integration requires an application password, not the password used to login to the web interface. To create an application password:
-
Login with the Jira integration operator you created earlier.
-
Select

-
Go to Application passwords and click on the Add button.
-
For Application name, choose TOPdesk Jira Integration.
-
Choose an expiration date in the future and select Create.
-
Save the application password so you can use it in the next step.
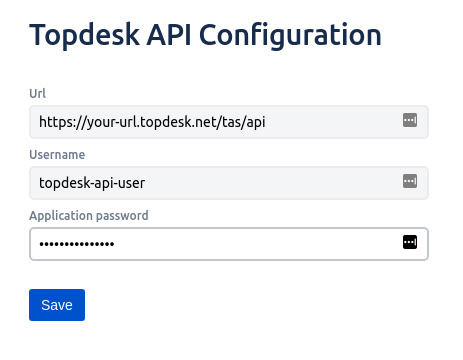
Step 3: Configure the TOPdesk API details in Jira
Once the app is installed in Jira and you created a functional operator in TOPdesk, you can fill out the API details in Jira. You can find the API settings by following these steps:
-
Login to Jira as an administrator.
-
Select ⚙️ in the top right corner
-
Select Marketplace Apps
-
Find TOPdesk integration in the menu on the left and open API settings.
On the API settings page, you are presented with three fields that are used to give the app access to TOPdesk.
|
Input field |
Description |
|---|---|
|
Url |
This is the URL that points to your TOPdesk SaaS instance. The URL is typically in the format |
|
Username |
This is the name of the functional operator that you created in 2.1: Create an operator. |
|
Application password |
This is the application password of the functional operator that you created in step 2.4: Create an application password. |
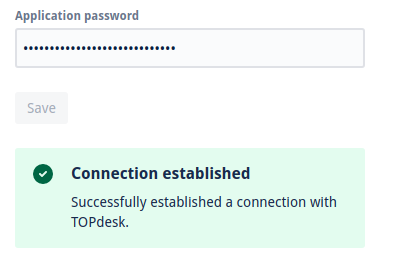
When you have correctly filled in the API settings, you will get the following success message:
If there is something wrong, you will get the following error message:
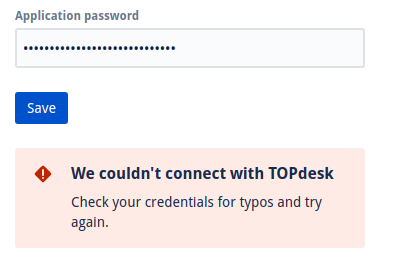
If you need any help with the installation, you can reach out to our service desk: https://avisi-support.atlassian.net/servicedesk/customer/portal/55 🔗
Installation complete
When the API settings are set correct, you are connected to TOPdesk. You can now start to create issues from Jira or changes/incidents from TOPdesk.